Brew Dudes

Homebrewing Blog and Resource

The hobby of homebrewing beer

Homebrew Kegging Tips

In this 6th and final video of our Intro to Homebrew Kegging series, we take a final look at some key concepts and present tips for you to keep in mind when making the switch from bottling to kegging.

We discuss the general costs associated with starting up with kegging. For a single keg setup with a single faucet you can expect to pay around $200 dollars. If you want to go all the way to multiple kegs for serving, multiple faucets for serving and a few extra kegs for conditioning; expect to lay out closer to $400-$500.

We recap the three most homebrew kegging tips we think you should keep in mind before moving from bottling to kegging.

1. How are you going to store and chill the beer? What do you want to serve it out of? Have a plan.

2. Be sure you research in advance how your going to get your CO2 tank filled. Swaps or fills. Do this before you buy any equipment.

3. Lastly, focus on balancing your system. Understand the relationship between carbonating pressure and serving pressure and how to apply the right amount of restriction. Remember 3/16th inch beverage tubing is the way you want to go.

Enjoy the video. Leave questions in the comment section either on the site or on our YouTube Channel.

BREW ON!

Watch the rest of the video series.

More Kegging Homebrew Videos:

Video 1 – Introduction To Kegging Homebrew

Video 2 – Everything You Wanted To Know About Corny Kegs

Video 3 – Learn Something About CO2 Tanks and Regulators

Video 4 – Guide to Keg Faucets and Towers

Video 5 – Balancing You Kegging System

Saison Yeast Strains

I am preparing for this summer’s Saison throwdown. Even though the style is one of the least clearly defined in terms of grain bill, color, alcohol content, etc., the yeast is the one ingredient that makes the saison unique.

Looking up saison yeast strains, I was happy to see there were many different choices for homebrewers to use.

A few summers ago, I wrote a yeast profile on one of the White Labs strains. It was one I used in my recipe and it performed well. It did not quit on me, seemed to handle the warm temperature without a problem, and produced a beer that did well in competition.

Now White Labs has three strains available. Their Saison I (WLP565) and Saison II (WLP566) yeasts are available all year round. Their Saison III (WLP585) strain is available in July – August according to their website.

Wyeast has two strains. One is their Belgian Saison strain (3724) and the other one is their French Saison strain (3711).

Danstar has a dry Saison strain. If you are so inclined, their Belle Saison Yeast may be one for you to try.

The big issue with Saison yeast is the habit of the Dupont strain (WLP565 and Wyeast 3724) to get stuck during fermentation. The yeast activity halts and the gravity is no where near the target final gravity. Many homebrewers report that waiting a few more weeks and/or raising the temperature of the carboy will get your beer to ferment completely. Some other homebrewers claim that have to add another clean yeast strain, like WLP001 to ferment the beer completely.

I didn’t have a problem with the White Labs I strain when I used it, but I think since there was such a large issue with the Dupont strain the main beer yeast providers introduces alternative Saison stains.

With a good amount of healthy yeast, well oxygenated wort, and warm temperatures, I think you should be ok to use any of these Saison strains without having to follow emergency procedures.

What is your experience with these Saison strains? Do you have any tips to share?

Zythos Hops

Mike and I were putting together the conclusion of the kegging video series last night and I sampled the last gasp of his Falconer’s Flight IPA. Sipping it, I remembered there are other hop pellet blends available to try in your next IPA or APA. Another popular hop blend is Zythos hops.

With the increased demand of certain varieties like Citra and Simcoe, Hop Union wanted to be able to provide for all brewers looking for hops that best suited their IPA needs. This proprietary blend of American hops is meant to be a substitute for other well known and well used hop varieties.

After Mike used Falconer’s Flight in a IPA, the complexity of that blended hop pellet has me hooked on trying other ones in my own brews. These blends are definitely to be used late in the boil, at flameout, or for a spell of dry hopping after fermentation for the most desired effect.

It is supposedly a blend of the big “C” hops, but I couldn’t find any concrete information on which specific varieties are used.

Check out the rest of the details for the Zythos hop blend pellets:

Origin: USA – Hopunion

Aroma/Flavor:  Like Amarillo.  Not much grapefruit flavor.  More tropical fruit flavors

Alpha Acid: 9 – 11%

Typical Usage: Dual Purpose

Beer Styles: IPA.  American pale ales.

For homebrewers, I think that these hop blends are great for experimentation.  They are sort of like malt extracts where you do not control the blend of what is in them, but at the same time the measurements are all done for you.  Just throw them into your next brew and go!  There is no need to sweat out the measurements.

If you are will to try something new, I think that the Zythos hop blend would be a good choice for your next India Pale Ale.

Balancing Your Keg System

In this latest video of our kegging series we address how to balance your keg and CO2 setup to get a great pour with minimal foaming.

A balanced system is critical to keep your beer carbonated at the levels you want, but also allows the beer to be pushed out of the keg with enough force to fill your glass, but minimizing foam. Too much foam and you end up wasting beer because you inevitably pour off the foam to try and fill it with more beer. Professional set ups view this aspect of draft beer maintenance as critical to achieving maximal return on each keg of beer ($/pourable beers).

Luckily, it’s not really that hard to do. In this video, I discuss the concept of restriction and how providing the right back pressure via the exit tubing keeps all the pressures in balance. Allowing a great pour and keeping your beer carbed and ready for that next pour. Do not underestimate the value of 3/16th inch tubing when setting up your beer lines!

Here is a link to a carbonation chart I mentioned as well:
Carbonation Chart

Enjoy the video.
BREW ON!

More Kegging Homebrew Videos:

Video 1 – Introduction To Kegging Homebrew

Video 2 – Everything You Wanted To Know About Corny Kegs

Video 3 – Learn Something About CO2 Tanks and Regulators

Video 4 – Guide to Keg Faucets and Towers

Video 6 – Hombrew Kegging Tips

Homebrewing Note Taking

For a long time, I didn’t take any homebrewing notes consistently for my brews. I did scribble some information down for a few of my first brews back in 2005, but after that I didn’t do it much.

I have a blog, don’t you know.

Seriously though, most of my note taking was on the blog. If I had questions later on, I would just search Brew-Dudes and then find the recipe or the brew day that I was looking for.

The thing is, I wasn’t capturing every last detail in blog posts. I was typing them up later on that day or most times a few days later. By that time, the small details were probably forgotten or I decided not to include them in the post.

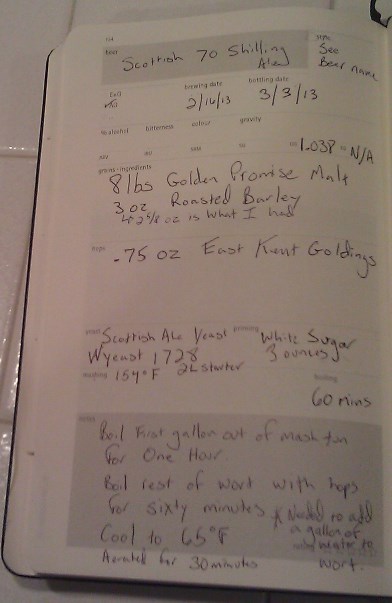
Earlier this year for my birthday, my wife bought me a nice Moleskine homebrewer’s journal that I have been using ever since. It’s a good size – it doesn’t take up much space on the table when I am measuring ingredients and it’s easy to carry around.

Homebrewing Journal Homebrewing Note Taking

This particular journal has a nice template for the brew day with information for the recipe and space to jot down notes on how the session went. There other templates in there including one for tasting beers. It’s pretty cool and a thoughtful gift. I know I wouldn’t have bought it for myself. It is interesting to know that the hobby has become popular enough that this kind of journal – specialized for beer brewing and beer tasting. Maybe I shouldn’t be so naive.

Anyway, homebrewing note taking is something that I think is important to do if you want to keep getting better at your craft. Even if you have a great memory like I claim I have, you aren’t going to remember every thought you have and you should write down things to keep in mind for next time.

If you want a good home brewing log sheet, download the one Mike posted.

Page 167 of 322

Powered by WordPress & Theme by Anders Norén