
Welcome To Fermentation Friday – July 2008
July’s Theme: What one tip would you give a beginner homebrewer before they brew their first batch and why?
Thanks to all bloggers that submitted posts to us for Fermentation Friday and thanks to Adam at Beer Bits 2 for starting the event and allowing us to host. And now without any further adieu, here are the submissions in no particular order:
EvilchurchdOc types: One tip that I alway give beginning homebrewers who are using extract is to move up to a full boil as soon as possible. This will help reduce the flavors from the extra carmelization of the wort and the darkness caused by the concentrated boil. Also I add that you need to turn off the flame and stir during the extract addition to reduce or eliminate scorching and further carmelization of the wort.
patrick Mor from Facebook commented: sanitize because no mater how good your ingredients your brew will taste like ass…
Aaron commented: I dunno, I still think after all these years, Relax is the best advice out there. There’s lots you can do wrong when making beer, but 95% of it will still result in decent beer, just not ideal beer.
Bryon sent along this post with the suggestion of avoiding distractions.
Adam @ Beer Bits 2 supports the mantra of Brew It Your Way.
Andy reassures beginning brewers that the process is simple and provides a nice graphic to help illustrate his point (literally).
Bunz breaks it down to three things: Sanitize! Sanitize! Sanitize!
Steve/hbbeerguy posted on Aleuminati: Spend decent $ on good liquid yeast for the style you are brewing (or culture it from a good bottle of beer). Yeast is THE most important ingredient of any brew… It defines the style and is usually the difference between a good drinkable beer and one you pour down the drain! It is well worth the extra 5 or 6 bucks to get good liquid yeast rather than use the fifty-cent dry yeast. You get what you pay for!
Da OD seconds Steve’s sentiment with an AMEN BROTHER!!
Use high quality yeast, High quality ingredients (especially the water), and Sanitize everything.
Virgil G suggests: Let it fully ferment, then give it a couple of more days. Otherwise you might get to clean up some exploded bottles.
DJ (Deege) thinks you should become an apprentice and watch someone else brew first.
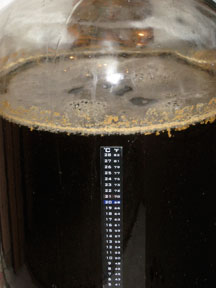
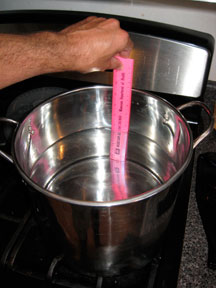
Eric (Chemgeek) sent this tip (along with two pictures):
Easy volume measurement.
Spend some time calibrating your brew kettle and carboys. Use a ruler (plastic one) to correlate depth to volume for each kettle you may use. That way when you need a specific volume, you can directly add it to your kettle until the correct depth is reached. To simplify the measurement of 5 gallons in your carboy. Add 5 gallons of water to the carboy and place a temperature strip on the carboy so that the top of the strip is at the 5 gallon mark.
Matt C. tells beginners to not stress out since beer isn’t as fragile as you may think. You know, relax.
Ray and Melissa write about staying organized with a checklist. Write things down!
Travis has great advice: Dive right in!
Rob and Des provide these two tips (one each!): Drink more beer more and keep an eye on the ol’ brewpot.
Jon wishes he could do it over again and read any competent brewing manual/instructions before brewing his first batch.
Marcus has a late addition on his Final Gravity blog.
What a cool event! Incredible suggestions from the homebrewing blogging community! Thanks for reaching out and sending us your thoughts. If you would like to contribute, please post your thoughts in the comment field below or you can email them to us.
Here is the Brew Dudes tip (Thanks Mike!):
Recipes are recipes. And unless you have a difficult time following a recipe, the contribution that a good recipe has on your final brew in a fixed variable towards making better beer. Let’s face it: yeast do most of the hard work for us brewers. When you are still “green” to brewing, managing your fermentation is the best way to start moving from good beer to better beer. And who doesn’t want better beer!?Fermentation is everything in the brewing process. Managing yeast cell counts (pitching rate), yeast health, and temperature control are crucial factors for getting the perfect fermentation. Any good experienced brewer will tell you to make a yeast starter. However, for the “greener” brewer that only has 2-3 batches under their belt jumping right into starters, while certainly good for yeast management, is not exactly the easiest step towards making better beer. By not overly complicating your brew day you can focus more on mastering the basics of wort boiling, chilling, and sanitation.A simple and affordable alternative is to use some of the high quality dry yeasts available on the market from companies like Danstar and Fermentis. The nicest thing about dry yeast is that one package generally contains more than enough cells to ferment any average gravity wort (O.G. < 1.050). The choice to use dry yeast usually makes for a simpler brewing process and a slightly cheaper (which can be a relief with the cost of hops and malt still on the rise); albeit at the sacrifice of the variety you can get with liquid cultures from Wyeast and Whitelabs.
The critical factor for using dry yeast is the re-hydration step. Many beginner recipes will simply have you sprinkle the dry yeast over the chilled wort. This is not the best practice. Some sources cite that this practice results in up to a 50% decrease in viability of the yeast cell count…meaning many of those cells you pitched just don’t survive the re-hydration. The best way to ensure the greatest effectiveness of your dries yeast is to rehydrate in clean, sterile water. The best technique is to boil up a pint of water to sterilize it at the start of your brew session in a small sauce pan. The cover the pan with the lid and set it aside during your brew session. Just as the boil ends and before you start the chilling process is when you should start to rehydrate the yeast. Open up the sauce pan and sprinkle the dry yeast over the top of the water and recover. After you go through your wort chilling process the yeast should be almost entirely rehydrate at that point. Anticipate at least 15-minutes to rehydrate.
You will know the yeast is full hydrated when the water now looks a little creamy and cloudy. There should be very little if any “grains” of yeast still floating around. It’s OK to gently swirl the sauce pan a bit if you think there is too much stuck to the sides or not all the yeast seems to have taken the plunge into the water (sometimes they can seem a bit hydrophobic and are stuck on top of the water). Now that the yeast is ready you can pour it right into your wort. If you are using a bucket fermentor as most of us did just starting out pouring is a snap. If you use a narrow necked carboy be sure to include a funnel in your sanitation procedure while cleaning and prepping the fermentor. You did sanitize your fermentor right????
Properly rehydrated dry yeast can help you make a cheap and easy leap forward in the quality of your brewing. Master this part of your brew process and you’ll be even more ready to move on to yeast starters and controlled fermentation temp before you know.
Brew On!
Travis
Good stuff! Here is mine contribution to the conversation.
http://www.cnybrew.com/2008/07/fermentation-friday-dive-right-in.html
Loot
Here is lootcorp.com’s entry:
http://www.lootcorp.com/2008/07/25/fermentation-friday-3-advice-for-the-noobs/
Thanks!
chris
I have been inspired to start blogging about my hombrew. here si my contribution
http://bobsplacebrewery.blogspot.com/2008/07/kiss-combined-with-mise-en-place.html
The Dude
The email got bounced back to me for some reason, but here’s my entry:
http://akelasbiggins.blogspot.com/2008/07/tempted-but.html
Thanks for hosting dudes.
Bryon
Some great tips here this month… Who’s next month and what will the topic be?
John
August Fermentation Friday has been announced!
http://beerbits2.blogspot.com/2008/07/august-fermentation-friday-panhandle.html
PealleyMeetry
Hi
As a fresh https://www.brew-dudes.com user i only wanted to say hi to everyone else who uses this bbs 😉
Scott
I rehydrated my yeast by boiling the water, then sprinkling the yeast in while it was still very hot. I had to let it sit for quite a while, while I got my batch to the right temperature. I then stirred it in. Is it ok to put the yeast in at such a high temperature, then let it sit for up to 2 hours before mixing it in? Additionally, how much yeast nutrient should I use for a batch of 23 liters?
John
How hot was the water when you put the yeast into it?
Scott
had finished boiling about 5 minutes before. I’m guessing it’s dead cause my beer isn’t bubbling after 36 hours of pitching it in there…. I’m assuming it’s okay to ‘try again’ with the same brew and throw some more in there..
Mike
Scott:
If you boiled the water and didn’t let it cool to at least 85F, y ou’ve really damaged your yeast. I would suspect you killed your yeast (or reduced the viability so low that you just don’t have enough left to see any activity yet). Why wait for the wort to cool to the “right” temp when you are putting the yeast into near boiling water to rehydrate. I only point this out so that it makes some sense.
I would get a new pack , rehydrate it in cooled water, then pitch it in.
Scott
Mike,
I’ve done exactly that and already the new one is bubbling along. Thanks for all your good advice. I’ll get there, slowly but surely.
Thanks again,
Scott
loqi0238
I’m working on a Cali common right now, and had some boilover…so instead of the 5 1/2 gallons id usually use, I dropped it to 5 1/4. I’m trying to make the leap from recipe kits to choosing my own ingredients. Any advice on what to look for or avoid? I’m sticking to ales at the moment, as i don’t have a kegerator or any way to maintains a cooler than room temperature. Thanks in advance for the advice, and Brew On!
John
Get yourself a good homebrewing recipe book and find a homebrew store that has a good variety of fresh ingredients.
Drew
I am a 22 year old engineering student who just barely started. I’ve made one batch a couple months ago and I just started my second. I’m still experimenting so I added some huckleberry honey, 100% natural and local from my hometowns farmer market, along with the booster provided in the Mr. Beer basic 40$ package. I added it straight to the wort while hot. I poured the wort into the keg and let it cool a bit. I then added a small drop of olive oil after adding the yest. This is supposed to help activate the yeast with minimal wort oxidation. I’ll let it ferment for 3 weeks, then carbonate for 2 weeks and cold condition 1 week in my fridge. I am completely new to beer brewing but I understand basic chemistry. Any advice would be appreciated. And if you have experimented with olive oil am I going about it the wrong way?
John
Hey Drew –
Thanks for leaving a comment and welcome to homebrewing. I haven’t used olive oil in my brew and I wonder if it is really necessary. I haven’t had problems with oxidation so I don’t feel like I need to be adding anything extra to prevent it.
Buy the book _Brewing Classic Styles_. I have found it to be helpful in many ways.