
Brew Dudes

Homebrewing Blog and Resource

The hobby of homebrewing beer

Brewing Saison with Brettanomyces

Brewing with Brettanomyces is a new thing for these Brew Dudes. We are only beginning to catch up with everyone else and starting to thing about all these alternative microbes and the flavors they offer us. I hosted an open brew session at my place at the start of May. Early May just happened to line up with the AHA’s Big Brew Day. We used the day to celebrate the homebrewing with some fellow brewers and to kick off a local home brew club. For the brew session part of the day, I tried brewing Saison with Brettanomcyes. I brewed a double batch of wort, pitched both with Saison yeast and added some Brett to one of the carboys. Now being the first of July, its time to taste.

The both ferments attenuated amazingly well going from and OG of 1.062 down to 1.002. Interestingly, I got the same results with the Belle Saison strain last year when I brewed my first Saison. This years recipe attempted to add a bit more complexity while backing off the wheat malt a little bit.

Interestingly though they are both at the same FG, 1.002 despite one being pitched with Brett. I don’t really know what to expect or how to interpret this. Perhaps the great attenuation of the Saison yeast was too fast and complete for the Brett; not leaving much behind for the Brett to work with. That being said I also don’t know if brewing saison with brettanomyces would produce a FG below 1.000. I suppose an interesting experiment would be to draw off a gallon from the cold keg in a purged small carboy and see what happens if I let it go for another couple months.

All in all it was a interesting first attempt at brewing with some Brettanomyces. I did save some slurry and plan to repitch it into something else soon to see what the results might be. I am sure there is somewhat more Brett in there than what I pitched originally.

As for how the beers taste, you’ll have to watch the video!

Brew On!
BIAB Series – Red Vs. White Wheat

As discussed in this video post about understanding the difference between red and white wheat and our plans for brewing in a bag (BIAB), I started to make a plan to brew small quantities of beer to compare and contrast red wheat malt and white wheat malt.

There are a few different experiments that we would like to do between now and the end of the summer so this post is the start of the BIAB series where we use this method to brew a good number of beers over the next few months.

Using BeerTools, I was able to scale the amounts of grain to make 1 gallon recipes. Since I have a small pot, I can brew up that amount of volume pretty easily and hopefully fairly quickly following the BIAB method.

So, these recipes are very simple, following the single malt and single hop (SMaSH) convention which should help these Brew Dudes to learn about both wheat malt types.

Here are the details:

Mash volume/boil volume: 2 gallons
Batch size: 1 gallon

Ingredients:

2 pounds of wheat malt
.25 oz of Willamette hops
Yeast: White Labs WLP001 California Ale

Instructions:

Pick one of the wheat malts.

Mash it in a muslin bag in a pot big enough to hold 2 gallons of wort for 1 hour at 149 degrees F.
Remove bag and drain well. Add hops and boil for 60 minutes. Cool wort to 72 degress F and transfer it to a gallon bottles. Ferment at this temperature for 2 weeks. Transfer to a bottling bucket and prime using a calculator so you know how much sugar you need for a gallon of beer.

Choose the other wheat malt and follow the above instructions.

Predictions:

BeerTools gave me different results for white wheat malt vs. red wheat malt. Here’s the average between the two recipes.

Original Gravity: 1.054
Terminal Gravity: 1.012
Color: 5 °SRM 3.00 – 6.00 °SRM 87 %
Bitterness: 25 IBUs
Alcohol % of volume: 5.5%

One interesting thing from the tool calculating these recipes was that the red wheat malt would make a beer with a darker color than the white wheat malt beer. We’re talking about the difference of a few degrees SRM but it will be something I will report on when the experiment is over.

Feel free to follow along. I will be ordering the ingredients this week.

Down Under IPA

My collection of Australian and New Zealand hops is to the point where I need to brew something or it’s going to start to look like that I am building a museum for these varieties in my fridge.

I started to examine the hop profiles and began to put a plan together to hopefully meld all the flavors from each hop into a pleasing blend. Without real brewing experience with any of these hops, any plan I put together will only be theoretical.

So this India pale ale will be using hop varieties from AU and NZ to support the flavor and aroma of this beer. We’re going to be using a large amount of hops, or at least compared to the typical amounts that I use when I brew.

So let’s get into it. Let’s turn the malt up a bit so we can have a good delivery system for the hops.

Down Under IPA All Grain Recipe

Boil size: 7 gallons
Final batch size: 5.5 gallons
Volume for fermentation: 5 gallons

Ingredients:

13.0 lbs. American 2 Row Malt
1.50 lbs. Pilsner Malt
.5 lbs Caramel Malt 60°L
0.75 oz Warrior hop pellets (16% AA) boiled 60 minutes
1 oz Pacific Jade hop pellets (13% AA) boiled 10 minutes
1 oz AU Topaz hop pellets (12.5% AA) boiled 0 minutes
1 oz Nelson Sauvin hop pellets (11.5% AA) boiled 0 minutes
1 oz Galaxy hop pellets (13% AA) dry hopping
Yeast: White Labs WLP001 California Ale

Instructions:

Mash grains at 149°F for 60 minutes. You can extend the duration of the mash to 90 minutes if you feel like you haven’t gotten full starch conversion after an hour. Start the boil with 7 gallons of wort and add the hops when indicated. After the boil, chill the wort to 67° F and aerate it well. Pitch a mighty amount of yeast and ferment at 67° F for two weeks. Rack to a secondary vessel and add half of the Galaxy hops to the beer. After three days, add the second half of the Galaxy hops. Bottle or rack as usual.

Predictions:

Original Gravity: 1.069
Terminal Gravity: 1.014
Color: 10.69 °SRM
Bitterness: 58.0 IBUs
Alcohol % of volume: 7.2 %

I have read a few tips on dry hopping IPA with a couple of charges. I have dry hopped in the past and have had good success in getting aroma out of the finished beer. I am looking to get some clean bittering from the Warrior hops to support the herbal, spiciness from the Pacific Jade, and fruitiness from the Topaz, Nelson Sauvin, and Galaxy.

How Much Lactose To Add For A Cream Ale?

A question I see often popping up on different internet forums is,

“How much lactose to add for a Cream Ale?”

The answer is, “None.”

I don’t know where this idea comes from but it seems to be popular enough of an idea that it isn’t hard to find on the web.  Watch this video to learn more.

Cream ale is best thought of as a yellow lager beer for non-lager brewers. The most accurate part of the beer style name is that it is indeed an ale. Fermentation for a good cream ale usually occurs in the 65-68° F range with American Ale Yeast.

The most inaccurate part of the style nomenclature is the use of the term “cream”. Cream ale is light and crisp. The best examples are dry and demonstrate some nice Pilsen malt character. The mouthfeel most of all is a medium to low body, typical of a pilsner. These characteristics combine to define a reality…there is NO place in Cream Ale for Lactose!

American cream ale usually employs a small (10% or less) amount of flaked corn or maize. The usage of this ingredient helps to lighten the body without contributing much flavor. Because of the lower fermentation temperature usually used a lower vigor to the ferment is usually seem. This may leave a slight corn like character to the beer. Which I suppose historically would come across as a cream like flavor or component. But even that flavor if present at all should be restricted and at low levels. Detectable corn flavors in any brew are an off flavor to be avoided, and American Cream Ale is not a style the serves to catch poorly fermented beers with corn flavor in it.

I love American Cream Ale for its simplicity and its easy drinking qualities. I generally do not tell people who are not craft beer indoctrinates the style name is Cream Ale. I usually simply refer to it as an American Light Ale hybrid. (People like the word hybrid.)

So keep your Cream Ale’s dry, light and crisp. Understand what ingredients you use in your favorite beer style and understand why its there… and why it’s not!

BREW ON!

Wedding Mead Update

Mead Check-In

After a few weeks fermenting in the buckets, I checked on my mead that I am making for a wedding that happening in September.

The nutrient addition schedule was followed and from outside observations, all looked like it was going as planned. Unlike beer, mead takes some time to ferment all the way to completion. What I mean about “some time” is more than two weeks.

Checking on the mead consisted of opening up the buckets to see what it looked like, taking a gravity reading, and having a bit of a taste.

The full batch size is ten gallons but since I don’t have a fermentor big enough for the whole batch, I have split it in half and it fermenting in two separate buckets.

Similar but Different

So I took two separate gravity readings and discovered something interesting. I had two different readings. Not slightly different but large enough to wonder why.

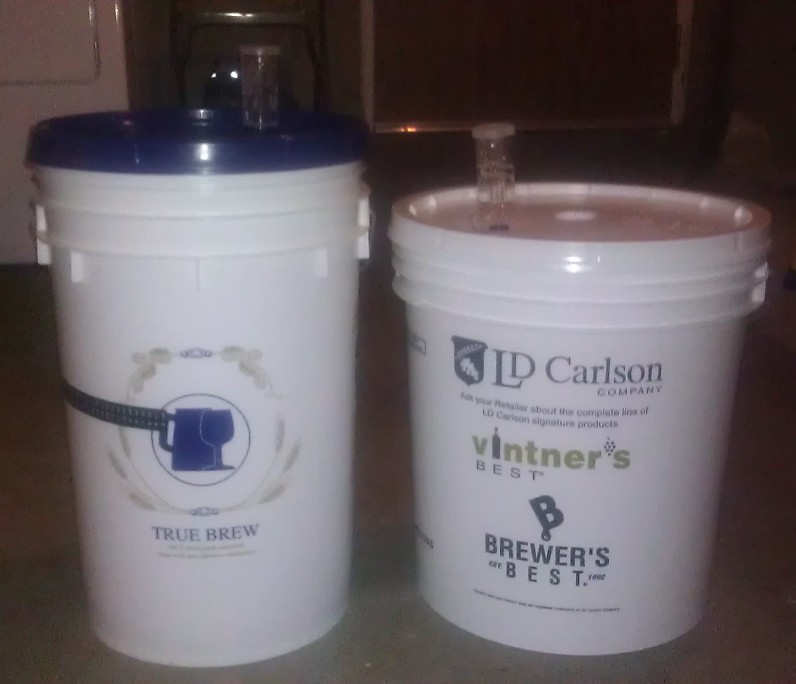
Here are the two buckets.

Wedding Mead FermentationWedding Mead Fermentation

So, the mead in one bucket gave me a reading of around 1.010. The other one had a reading of just under 1.020!
Now I am not going to tell you which one gave me the higher reading until a few of you guess in the comments.

The starting gravity for each bucket was around the same – both were in the 1.090s. I added two proofed packets of champagne yeast to both of them and they were fermenting in the same space for the same amount of time.

I know that fermentation is a delicate matter and that the shape of the vessel can have an effect on the final product; that is, it can be noticeable in a side by side comparison when fermenting in different vessels.

I wonder if anyone knows or can guess which fermentor helped the yeast do their job faster. Do you know? Leave a comment.

How Did It Taste?

The samples of each tasted on par for what mead tastes like at this stage. The one with the higher gravity did taste sweeter as expected.

I am not worried that they won’t both end with the same gravity. The 1.020 mead appeared to have more yeast activity going on than the other one.

In a week, I will check again and I hope I will have readings that are closer to each other. Once they’re done, I will rack them and let them condition for a couple of months.

So – what’s your guess?

See phase 2 of the project here.

Page 134 of 322

Powered by WordPress & Theme by Anders Norén