Brew Dudes

Homebrewing Blog and Resource

The hobby of homebrewing beer

Sanitizer and Bottle Brush

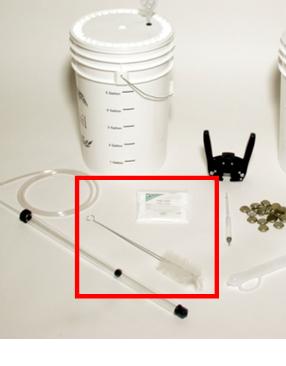
This is the last post of the beginner kit item review. The last items, highlighted in the picture below, are used to keep your other equipment clean.
Sanitizer

The white packet is sanitizer. Any piece of equipment that will come into contact with your brew should be sanitized* before brewing. The sanitizer in the packet is most likely in a powder form. To prepare and use the sanitizer, follow the directions on the packet.

*Sanitized is different than clean…we’ll discuss the difference in a future post. 🙂

The bottle brush is used, you guessed it, to clean the inside of your bottles. You will want to clean your bottles well to avoid contaminating your beer. I ruined a perfectly good better because I was lazy and I didn’t do a good enough job cleaning my bottles.
As I alluded to earlier, cleaning bottles and sanitizing bottles are two different things. We’ll go through each process…in an upcoming post.

Thanks for reading these posts describing the items in a beginner brewing kit. If you missed anything, be sure to check out the following sections:
Bottle Capper

Bottle Capper

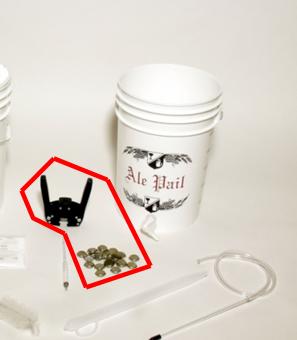
Another funky red highlight for the next few items for this review. I am sure you have seen bottle caps before, but the black device with the two handles is a bottle capper. Although it looks like a medieval era implement of torture, it’s a very kind and gentle tool that allows you to top your bottles with caps.

When I first got my kit, I thought it was going to be difficult to use…but I found it to be very easy. There is a magnet in the middle of the capper that holds the cap in place. Once you line up the capper with the top of the bottle, you pull down on the two handles and voila your bottle is capped.

Here are some other articles for homebrewing beginners:

Hydrometer

To talk about this item, I couldn’t use the ol’ rectangle to highlight it.

Hydrometer

Not sure what kind of shape that is, but it gets the job done.

This is an item that you may not have seen before, unless you have random, esoteric instruments of measurement sitting around the house.

A hydrometer is used to measure the specific gravity or density of a liquid as compared to water.

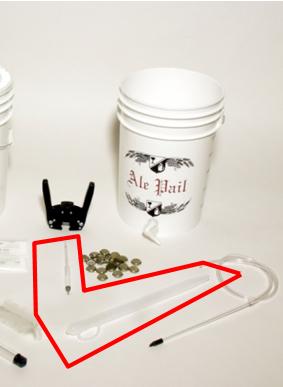
If you look at the photo, there are two things highlighted. The plastic cylinder on the right is used to pull a sample of your brew. The other item, the glass tube with the black tip, is placed inside the plastic cylinder and allowed to float in the sample.

The glass tube has a weight at the bottom of it and scale visible near the top. When the tube comes to a stop after floating in the liquid for a few seconds, you can line up the top of the liquid with the scale on the tube. The reading on the hydrometer tube can be recorded as your wort’s specific gravity before fermentation.

For your reference: Water has a mark of 1.000. My maple porter had a measurement of 1.080…which means my wort was denser than water due to the addition of a lot of malt and maple syrup. Note: We actually didn’t use a hydrometer to get this reading. We used Mike refractometer to get this reading. These are more expensive devices but make measuring specific gravity a whole lot easier.

Taking a reading before and after fermentation can give you an idea of how much alcohol is in your beer. We will get into that calculation in another post.

Even though a hydrometer doesn’t help you to make beer, it can help you to better understand your beer.

Here are some other articles for homebrewing beginners:

Bottling Bucket

We continue this beginner kit review…already in progress.

Bottling Bucket

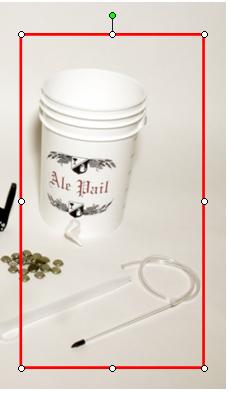
The item highlighted above is a bottling bucket. You can tell it’s a bottling bucket by the spigot that is visible near the bottom.

After the beer is done fermenting, you can transfer the beer (also known as “racking”) to this bucket so that it can easily be transferred to bottles for future consumption.

The bottling bucket allows you to get the beer off of the yeast and allows you to add some priming sugar to the beer before you put it into bottles. Plus the spigot makes it easier to get your beer into bottles if you let gravity help you out.

In the photo, you can see more plastic tubing. This tubing has a special valve at the end of it that only allows liquid to flow through it when the valve is pressed against something…like the bottom of a bottle.

It makes bottle filling easy and less messy.

Here are some other articles for homebrewing beginners:

Maple Porter Update

The maple porter is fermenting nicely.  The air lock is clacking like a freight train.

Page 317 of 322

Powered by WordPress & Theme by Anders Norén