Brew Dudes

Homebrewing Blog and Resource

The hobby of homebrewing beer

Yeast Blending Update

From several posts ago I whipped up an American Brown Ale in which I chose to blend to strains of dried yeast.  I spoke about the purposes of trying the blend in Yeast Blending post.

Now more than a month later I am prepared to share some results!

My primary goal with blending US-05 with S-04 was to see if the super flocculating S-04 would help to pull out the low flocculating US-05.  US-05 always seems to take more time to clear out, flocculation starting somewhere after day 10 in primary.  S-04 on the other hand tends to finish up and start flocculating within 3-5 days.

In this first pass experiment, I was pleased to witness that the total yeast suspension was falling out of solution very rapidly within 5 days.  By 14 days my final gravity (1.012) was achieved and the beer was basically clear.  I used a glass carboy just for the purpose of monitoring the yeast activity.  The yeast cake was very tight (as you see with S-04), but not as firm as you normally see with S-04 alone.  Perhaps this is a result of the combination with the lower flocculator US-05.

The secondary result is the taste.  I would say that the flavor is stil very English.   The ester profile still seems like the traditional S-04.  I would have thought that the two yeasts would have maybe made a mellower English profile.  The flavor is still good though and I would probably try this blend again when shooting for a well attenuated English styled ale.
Hop flavor did seem a bit diminshed though.  For all the Cascade hops in there I would have expected more bitterness.  But the hop “pop” you get when using US-05 alone isn’t there.  Again, this sort of profiles the English yeast again.  I think the bitterness and flavor gets a little lost with the roasty malts and the ester profile of the S-04.

Head formation and retention seemed to be normal for either yeast.

Overall, then I don’t think that the blend really gave me something in between the US and English profiles.  Perhaps the clean-ness of the US-05 just still lets the S-04 character shine through.  While this is not an extensive test (and I hate making and reading about one time experiments as a definitive answer), I found the results useful.  I will definitely try this experiment again as working with the dried yeasts is easy.  A great test for this “co-flocculation” experiment would be to blend some German Hefe-style yeast with S-04 and see how much of that pulls down.  I would not be looking forward to those flavor combinations though.

If it ever warms up here and I get my garden hose unburied from the snow, I’ll brew up the Cascade Pale Ale to accompany the Brown Ale…with the yeast blend for sure.

BREW ON!
Aeration Stone

Sorry I haven’t updated the blog in a few days.  My wife delivered our baby girl on Sunday night.  I am happy to report that everybody is well and life is back to normal…well, as normal as it can be.  I would tell you more but that’s another blog.

So, I have been thinking about another piece of equipment: an aeration stone…or more likely an aeration system.

The aeration system is not something I need to go all grain, but I think it would help my beers from being good to being great.

Right now, I aerate my wort by letting it run out of my brew pot’s spigot into my fermentation bucket.   I place my bucket two feet below my kettle and it splashes around real well.

I just wonder if that is enough.

I am thinking I could get an aeration stone, along with the aquarium pump, the HEPA filter, and the tubing and aerate my wort that way.

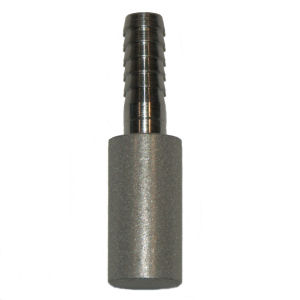
Here’s a picture of the aeration stone (made out of stainless steel):

Aeration Stone

What are your thoughts on aeration?

Bottle Your Brand Bottle Labels

Here’s the sitch:  The Brew Dudes get sent all kinds of requests via our inbox to review stuff, advertise, write books, etc.  Most of the requests are weird or don’t fit the theme of our blog or are huge scams.

Earlier this week, we got an email from a woman at a company that creates bottle labels.  They asked if they could send out some example labels for our review.  Since labeling homebrewed beer fits into our theme, I gave her an address she could send the labels and they arrived in a few days.

We are not getting paid for this review….and to tell you the truth, I am not going to really review them or the labels.  I am just going to share what they sent and you can review them yourself.

Bottle Your Brand is the name of the company.   It appears they have templates that one could use to quickly create bottle labels.  If you wanted to make something totally from scratch, they can do that too.

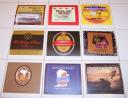
Here is a photo I took of some of the example labels they sent:


Bottle Your Brand


Some other points:

  • The labels are self-adhesive and waterproof
  • They make customized bottles of water too. (I have thoughts of putting my boss’s goofy mug on bottles of water for the next company meeting)
  • They ship throughout the US.

I am not someone who labels their beer often and when I do, I make my own. Not sure my labels stack up in terms of quality against theirs, but they do the job. If I were to brew a beer and give it away as some well put together gift, then I would check out what they had to offer and compare prices.

Glass Carboy

Since I have been typing up what I would like to buy in equipment upgrades for all grain brewing, I started thinking about other pieces that I would like to have.

At some point I would like to keg my beer, but it is not crucial right now.

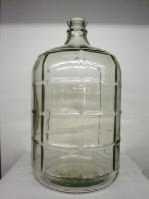
Another purchase that has an easier justification is a glass carboy.  Right now, I don’t have any vessel that would allow me to do any long (over 4 weeks) conditioning of my beer.  Currently, all my fermentation is done in a bucket, all my conditioning is done in bottles.

If I really want to brew a lager this year, I will need something where I can store the entire volume of the beer in one place for as long as several months (depending on the style).

We have discussed Plastic Vs. Glass on this site before.

Glass Carboy

I was thinking of getting a Better Bottle in the past but now I am leaning towards getting a glass fermentor because I know I can get one cheap at the homebrew shop near my work.   I would rather buy this item locally and not pay the shipping costs.

Ball Valve Spigot

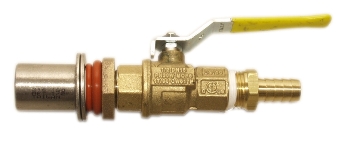
Another piece of equipment to convert my cooler into an efficient mash tun is a ball valve spigot.  I need to replace the spigot that the cooler came with, which isn’t made for long pours.  My thumb knows too well.

There are many spigots that are made specifically for cooler conversions on NorthernBrewer.com.  They are all under the heading of weldless so I should be able just to remove the factory-installed spigot and install the ball valve spigot.

The one I have my eye on has a half inch barb at the end of it so that I can attach tubing to the end of it.   When transferring wort to my kettle, I would like to avoid as much hot side aeration as possible.

Ball Valve Spigot

I think with the screen and the spigot (the screen attaches nicely to the spigot), I think my mash tun would be ready to go.

Page 274 of 322

Powered by WordPress & Theme by Anders Norén