
Another piece of equipment to convert my cooler into an efficient mash tun is a ball valve spigot. I need to replace the spigot that the cooler came with, which isn’t made for long pours. My thumb knows too well.
There are many spigots that are made specifically for cooler conversions on NorthernBrewer.com. They are all under the heading of weldless so I should be able just to remove the factory-installed spigot and install the ball valve spigot.
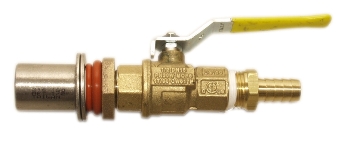
The one I have my eye on has a half inch barb at the end of it so that I can attach tubing to the end of it. When transferring wort to my kettle, I would like to avoid as much hot side aeration as possible.
I think with the screen and the spigot (the screen attaches nicely to the spigot), I think my mash tun would be ready to go.
Ben
Sounds good! I think you are on your way to an all grain brew!
Kevin
Just do it!
John
I will! 🙂
travis
just put about 5 or 6 feet of clear hose on the barb and you’re money! I got my setup right out of Home Depot, but it took a lot of tweaking to get things right. If you want to save time, do the Northern Brewer thing, if you want to save money, go to Home Depot.
Jason
The one I have on my cooler is great. Very easy to use and clean. On the subject of hot side aeration, I’ve posted a question on that on the tastybrew forum with regards to batch sparging, and the majority of opinion seems to think it’s hard to get on the small scale of homebrewing during the sparge, so I don’t think you will need to worry about it too much. Here the link to the forum post. http://tastybrew.com/forum/thread/153493
Cheers,
Jason
Brad
John,
Here is a great walkthrough tutorial/thread on making exactly what you describe, I have used it with great success!
http://tinyurl.com/88kvdo
Betz
Nice piece of equipment… Last winter, I bought BOTH the false-bottom piece mentioned a couple of posts back, and the ball valve (I decided to go for their deluxe model SS ball valve), and upgraded to a cylinder cooler style mash tun. The one I had before that was one that I had fashioned out of a rectangular cooler. I built a SS mesh screen out of the screen on a hot water heater hose, and fiddled around with the valve in home depot for hours on end. There’s sort of this implication that home-brewers are DIY’ers by nature, but for what its worth, those two pieces of equipment you have are the best upgrades money can buy. All you really need to start AG brewing is a cylindrical cooler, and an 1 – 1.5″ length of 3/8″ tubing to connect to the false-bottom to the ball valve, and you are set, my friend. Once you go AG, you’ll never go back, and you’ll have no regrets.
travis
we had a pretty good conversation on that here with pictures to boot!
http://cnybrew.com/2008/04/14/pushing-the-limits/#comments
In the end, there is not much to worry about hot side aeration. It has an impact on shelf-life. However, if you are like me, just put some rubber hose on the barb and problem solved. You don’t even need to sanitize it!+