Brew Dudes

Homebrewing Blog and Resource

The hobby of homebrewing beer

Bottling Beer From The Keg

When I first started kegging, it took at least a month for the coolness factor of home draft beer to wear off (some). But it really didn’t take long to realize the despite the ease of cleaning one keg versus 50 bottles, I was getting a backlog of beer. When you start kegging your beer, you tend to find that you are almost the only one drinking it. Mainly because it’s hard to transport a full keg of beer and CO2 to push the beer as well. That’s where learning to bottle beer from the keg is a life saver.

Bottling beer from the keg puts your beer back in the social circles of beer drinkers where it belongs. Beer is a social beverage and while it is great to pull up a chair and listen to the baseball game in the garage,  the novelty of that environment wears off pretty quick.

In short, the objective with bottling beer from the keg is to minimize the amount of foam as it goes in the bottle. Foaming in the bottle equals lost carbonation in the finished product. Now for competition purposes, just to be safe, you may want to slightly over-carbonate the beer before you bottle it.  To do this, I’d just advise cranking up the CO2 by about 3-5 PSI a few days before you plan to bottle. In competition, you’ll get a harder ding for undercarbed beer than over carbed beer. Judges can always swirl the carbonation out of a beer in the glass or let it sit for a few minutes. Heck, in a double IPA a little extra carbonation can really help carry some aromas out of the glas,s too.

Anyhow, in the video I present my ultra-cheap method for getting beer into bottles. I know there is cooler and pricey ways to do it. However, I have never experienced an judging score sheet that came back and said my beer was undercarbed, overcarbed or even the dreadful oxidized!

So, crank your dispensing pressure way down – just enough to get the beer to flow and away you go. Check the video for details.

BREW ON!

Filling from a Keg:

  1. Keg of beer must be chilled and carbonated.  I like to over carbonate by a few tenths (0.2) of a volume of CO2 to compensate for lost CO2.  (some of that lost CO2 is a good thing as I’ll state later)
  2. I use a black Cobra/Picnic tap to dispense the beer from.  I modify the tap into a filler by using a piece of tubing that will stick right over the spout of the tap (usually 3/8 ID tubing).  The length of the tubing need only be long enough to reach the bottle of the bottle.
  3. I chill down the bottles I plan to fill.  This reduces CO2 loss and foaming.
  4. Right before I am ready to bottle (bottles and caps washed and sanitized), I dial down the CO2 on my regulator to zero PSI, then I burp the keg to release all the head pressure.
  5. I put the tap with tubing filler into my first bottle and pull the trigger.  Then I slowly dial up the regulator until I have just enough pressure to get the beer flowing at a decent rate.  But not too fast to get excessive foaming.  This can be a little tricky to manage the regulator and the bottle filler at the same time.  But once you get the pressure set and the beer flowing; that’s it with fussing over the regulator settings.
  6. Fill the rest of my bottles and cap them.  Getting a little foam while filling is a good thing as it helps to purge out the ambient air and O2.  This minimizes oxidation of the beer after bottling.
  7. Once all the bottles are filled I reset the pressure on the regulator to my normal carbonating and dispensing pressure to keep the beer from going flat.
Dry Hopping With Pellets

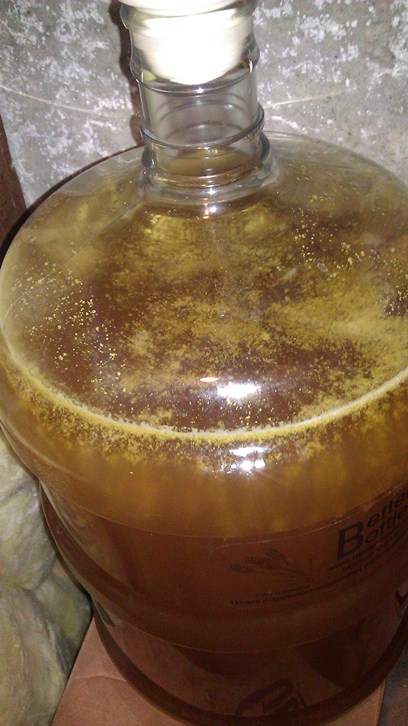
The Sorachi Ace Wheat beer is out of primary and now it is time to dry hop with the remaining hop pellets that I have left over from brew day. I stored the opened hops packet in a zip lock bag in the freezer. In terms of freshness, it is not the freshest hops I could use but it’s what I had.

I have dry hopped before, but I used my own homegrown hop cones. They were easy to put in the carboy but not so easy to remove once the beer was done picking up all the flavor and aroma.

This time around, I was looking forward to working with pellets. Once I cleaned and sanitized my secondary, I put the pellets into the carboy and then racked the beer on top of them. The pellets broke apart slowly as the beer was siphoned off the yeast cake.

Right now, the hop particles are mostly floating at the top of the carboy. Some are settling to the bottom, and I wonder if more of it, if not all, will end up down there.  I don’t think I will have the beer in the carboy long enough to find out.

Dry hopping with pellets

I learned from reading stuff online and in the For the Love of Hops book that dry hopping does not have to be a long time. Three to seven days appears to the range. I plan to dry hop for four days and then bottle.

Since this is an American wheat ale, the hop aroma is not that important to the style. I am not using a large amount of hops, just a quarter of an ounce of the Sorachi Ace hops. I wanted to get a better understanding of this variety and I thought using the hops in all stages of hopping would be a good way to learn the process.

Robust Porter Recipe

A robust porter is a roasty tasting dark ale full of bitter chocolate and coffee flavors. I have seen examples that are dark brown and others that are almost black in color. This style is bolder than a Brown porter but less intense than an Baltic porter. If you are looking for a great beer to brew for the colder months, this recipe is for you.

I tend to use English malts and hops for porters, but if you find American or even German varieties are more to your liking – go ahead and substitute.

Yeast strain should be a clean one. No funky Belgian strains if you are looking to brew to style.

Nice and Roasty Robust Porter Recipe

Ingredients:

10 lbs Maris Otter Pale Ale Malt
1.5 lbs Crystal 60°L
1 lbs Chocolate Malt; Thomas Fawcett
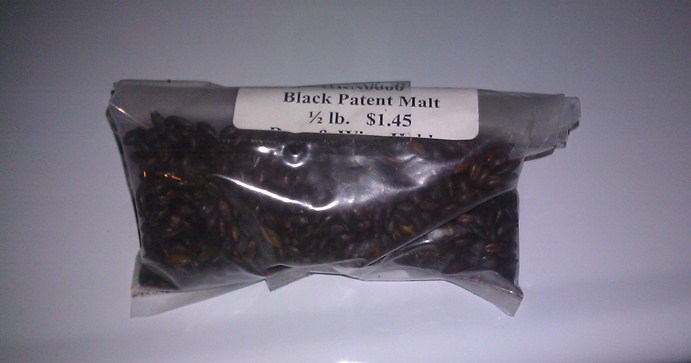
0.50 lbs Black Patent Malt
1.5 oz Fuggle Pellets, 4.75 %AA boiled 60 mins.
0.5 oz Goldings Pellets, 5 %AA boiled 15 mins.
0.5 oz Goldings Pellets, 5 %AA boiled 1 mins.
Yeast: White Labs WLP002 English Ale

Instructions

Mash the malts at 155° F for 60 minutes. Boil for one hour and add the different hops amounts at the times specified above. Cool wort to 66° F and ferment for two weeks at that temperature. Bottle or keg as usual.

Predictions

Original Gravity: 1.059
Terminal Gravity: 1.014
Color: 30.95 °SRM
Bitterness: 35.7 IBU
Alcohol (%volume): 5.9%

This is my tried and true robust porter recipe. It’s a style that is offered by many craft breweries and certainly many homebrewers as well. Again, you can substitute malts with ones that you like or have available to you. The black patent malt is the key to the complex, almost burnt flavors that you are going after with this beer. The chocolate malt give you that coffee roastiness. You can play around with different crystal or caramel malts for some different sweetness in the beer to counter the darker malts’ flavor.

Black Patent Malt

Ward Labs Homebrew Water Report

At the end of February, we talked about devising some experimentation around water chemistry. In order to do so we needed to take a look and get our local water tested by Ward Labs. We’ve done just that and now we can start making some decisions and insights into what and how we will change our standard practices in the brewing process.

We expected to get a report that told us our water was relatively soft, which it is. It has low calcium and low magnesium level. What came back as a surprise to us was that we are actually fairly high in sodium and chloride. The levels are at a point where we may need to dial them back a bit through dilution or otherwise attempt to balance it with an equally high amount of sulfates (and subsequently calcium). But that’s another video! Sorry kids.

Take a quick look at our report card’s numbers and judge for yourself. Then cruise on to the video and see what we think of our water predicament.

From Ward Labs in Kearney, Nebraska!
Sodium: 134 ppm
Calcium: 34 ppm
Magnesium: 5 ppm
Sulfate: 6 ppm
Chloride: 250 ppm

Bicarbonate (HCO3): 72 ppm
Total Hardness (CaC03): 106 ppm
Total Alkalinity (CaC03): 59 ppm

Enjoy the video. BREW ON!

Looking at some sources out there, here are the typical ranges for minerals in water that is ideal for brewing beer.

Sodium: Beer brewing range is 0 to 150 ppm
Calcium: Beer brewing range is 50 to 150 ppm
Magnesium: Beer brewing range is 10 to 30 ppm
Sulfate: Beer brewing range for hoppy beer is 150 to 350 ppm
Chloride: Beer brewing range is 0 to 250 ppm

What do you think? Have you worked with your water chemistry before? What tips would you give someone or someones that received a report like the one above? We’ll update you when we have tried out some attempts at altering our water for brewing.

Check out our first water chemistry experiment involving brewing an IPA.

Finding Purpose In Homebrewing Beer

Around this time in 2007, I wrote to Mike to see if he would be interested in starting a homebrewing blog.

His response was, “You know what…. Fuck it I am in.”

Since then, we have been writing posts to hoping help other homebrewers to brew better beer. Of course, better beer is just one step towards brewing excellent beer which is the ultimate goal for not only ourselves but for everyone who reads the posts on our site.

It’s been a fun 6 year run. We have seen visits to our site increase from our humble beginnings. By the middle of 2012, I think we lost the plot. We weren’t updating the site as much. We weren’t inspired.

At the beginning of this year, we made an effort to add more content to the site. Every Wednesday, we are putting up a video to enhance our written content. I hope you check out our videos. We are trying to make them educational.

The purpose of brewing your own beer is to produce something that is special, better than what others can provide.

I think we are getting back to the purpose of this blog. We are attempting to produce the best resource for homebrewers.

We don’t have the wisdom of crowds as you may find on discussion boards but what we provide is a great amount of research and first hand experience. We also provide a lot of sweat equity and time – the same things you and I put into brewing beer.

With the purpose of the best resource for homebrewing comes the meaning. If we always create with that purpose, we will be helpful.

We will help others to brew excellent beer.

So please share our “craft” content. Know that there are two guys who are trying to produce something that is special, unique, remarkable.

We appreciate your attention. We hope to realize our purpose with you.

Brew Dudes Find Meaning

These Brew Dudes are finding meaning in brewing on.

Page 164 of 322

Powered by WordPress & Theme by Anders Norén