
Brew Dudes

Homebrewing Blog and Resource

The hobby of homebrewing beer

Brewing American Cream Ale

This week we put a a little tasting video of American Cream Ale.  I like brewing American Cream ale at least once a year, more if I can.  American Cream Ale is a clean straw colored ale usually brewed with a touch of some adjunct like rice or corn.  Historically, it is one of the lightest ale brew, meant to compete with the Lager brewers of the day before refrigeration was widely available or affordable to all brewers.

As we sip this wonderful brew we hit the high points on brewing American Cream Ale, and what makes a great one:

First and foremost, to brew any light beer requires great yeast management and fermentation practices.  While we usually advocate making a starter I routinely get away with rehydrating two packs of dry US05 from Fermentis and upping the ueast nutrient at the end of the boil.  This has always given me a quick and clean ferment.  I like to pitch the yeast at 62F, let it go for a day, then reset my temp control to 65F and let it go there for another 5 days.  I’ll force the beer up to 68or 70F for the final week to ensure that the yeast dries out the beer plenty.

Second is the hopping.  I love to use Liberty hops in this beer. It has a nice combination of earthy notes but retains a very nobel hop like character in the nose.  I use liberty throughout.  Primarily at 60min, 20 min and just before flame out.  I sulfate addition to help accentuate the hops could be useful if you have very soft water.  However, I find the soft water also help maintain nice malt backbone that can get lost in a super light and super clean ale.  So its a balancing act between the two water profiles.  You just need to brew it and see which you prefer.

Third is the adjuncts.  Don’t be afraid of a little table sugar and or some corn or rice to help dry the beer out.  I like the use of flaked corn because it leaves a flavor mildly reminiscent of American light lager.  I brew this beer for many friends and family that aren’t necessarily craft beer people.  So that flavor profile (along with the pale yellow look) draws them in and makes them feel comfortable with a style of beer they’ve never heard of.

Brewing American Cream Ale is like learning how to make a good white sauce in the kitchen.  You just have to try it and have it in your brewing arsenal.  Brewing a clean American Cream ale if any thing should boost your confidence as a brewer to know that you can brew something that is so simple flawlessly.

Its a great beer to have anytime of year.  Give the style a go and let us know what your experience is.
Cheers.
Brew On!
 

Celeia Hops

Along with the newer varieties of Aurora and Bobek, the Slovenian fields have produced another pleasant hop. Celeia hops are another one to try if you are looking to brew something new.

Bred from Styrian Golding, Aurora, and a wild Slovenian hop, it is currently grown in a number of countries including Austria, Serbia, along with Slovenia.

With its lineage, there are some bolder flavors that Celeia brings to the party. It should be noted that Aurora is known as Super Styrian so some of those powers must have been transferred to the child.

Origin: Slovenia

Aroma/Flavor: Lots of sources described this hop as being pleasant, earthy, and spicy.  For The Love of Hops goes into greater detail about the stronger flavor profile.  It has, in comparison to its Slovenian cousins, more citrus-y aromas particularly grapefruit.

Alpha Acid: 4 – 6.5%

Typical Usage: Based on its low alpha acids, this one is better used later in the boil.  Brew with higher alpha hops at the start of the boil and showcase those unique flavors.

Beer Styles: Lagers, English Bitters and Ales

As always, a SMaSH beer is the best way to get an idea of what this hop tastes like in a finished beer.  Brew with a few ounces of Celeia hops and spread the additions across the full duration of the boil.

If you were looking to brew a Slovenian ale, you could brew one with a bittering charge of Aurora, followed up with a mid-boil addition of Styrian Goldings and Bobek, and finish it off with Celeia at flameout.

I am not sure how much different it would taste from an ale brewed with different German hops throughout.  Would German hops seem more floral as compared to the Slovenian ones?  Surely if the malt, water, and yeast choices were the same, you could make that comparison.

Hop Harvesting Video

For this week’s video we headed outside into John’s “Hopyard”! It’s late August and the hop cones are starting to mature, so it’s time to get to the hop harvesting, which means picking and drying.

To know that they are ready to pick, John looks for the cones to start to seem a little papery and crisp to the touch. He also looks inside the cones once they seem to be getting close for all that yellow lupulin oils building up. A few browning tips on the cones really indicate that the cone is maturing and is ready to go.

Just a tip on picking hops, the bines and leaves can cause irritation to your skin.  After a short time of contact with the plant, your arms and hands may be covered with a red rash and it may itch.  Make a point to wear gloves and a long sleeve shirt and you will be well protected when picking hop cones.

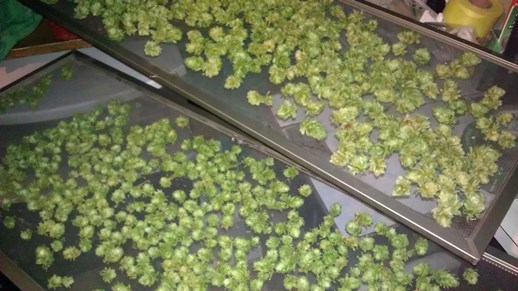
John goes ultra low budget and keeps with a simple DIY ethos. Pulling a few small window screens from the house, he props them up on shelves or chairs to ensure good airflow and lets them dry out naturally. After three days, the cones are bone dry and ready for storage in plastic bags with zip top closures.  Once they are in the bags, they can be stored in your freezer until brew day.  If you want to save yourself some time on brew day, you can pre-measure your hops for weight and bag them by size.

Growing hops is pretty easy once you focus on a little watering and a little composting. Each season the hops get more and more robust providing you with a good solid crop by year three.

Put it in your calendar to get some rhizomes next spring and you’ll be harvesting plenty of hops yourself.

Enjoy the video.

Homegrown Hops Harvest 2013

Four years ago, I began growing my own hops. There were no expectations on my part. If they grew and they produced cones, it would be deemed a success. The ultimate goal would be to have enough cones at harvest to brew a beer.

The first plants that I bought were Magnum and Mt. Hood. Magnum is a high alpha hop where a little goes a long way for bittering hops. The cones are large and have a pleasant hop aroma. Because of the size of the cones, the plant is a “quality over quantity” producer. At harvest time, there may not be as many cones, but the ones I pick are beauties.

Last weekend, the Magnum plant was harvested and I weighed all the hops before drying. The scale reading was over 1 pound. Once they are dry, the cones will weigh a third of that total but it was good to see the weight over a pound.

Next year, we have dreams of a wet hop brew but this year we’re drying them out for an Autumn ale.

The second year Cascade plant produced like a champ this summer. The cones on the upper half of the bines have picked and are now drying as well. Mike and I videoed a some thoughts about the Cascade plant a few days ago and we will post it tomorrow. The hops were not weighed before they were placed on the drying screen. From the looks of it, the yield will be between 1.5 and 2 ounces of dried cones. For a second year hops plant, I am happy with the amount I was able to harvest.

The third one, which is also four years old, is the Mt. Hood plant. My brother has been growing it and harvest time should be some time this week. From photos I have seen, we will have a hefty amount of cones and I plan to use them in an Alt or maybe a Yule Lager (recipe to follow).

Happiness is a couple of screens of drying hops.
Homegrown hops harvest 2013

Autumn Ale Recipe

The homegrown hops crop will be good this year. With the varieties I have on hand, I started to think about a simple American pale ale recipe where they could be put to good use.

Since this brew will be enjoyed after summer is over, here is my Autumn ale recipe.

Depending on the flavor and aroma of the Cascade grown in my yard, this beer could be pretty good or fairly weird. I am not sure what the terrior is going to bring to a well known hop variety, but as long as it seems American it might be ok. An American variety grown in America shouldn’t have a problem with an identity crisis but there is only one way to find out.

Simple grain bill with a few different hops addition. If my harvest yields more than an ounce of Cascade, I will add it to the boil – up to doubling the amounts below.

Ingredients:

10 lbs American 2-Row Malt
0.5 lbs Victory Malt
0.5 lbs 2-Row Caramel Malt 40L
0.5 oz Magnum Hops (14.50 %AA) boiled 60 mins
0.5 oz Cascade Hops (5.50 %AA) boiled 10 mins
0.5 oz Cascade Hops (5.50 %AA) boiled 1 mins
Yeast: White Labs WLP001 California Ale

Predictions:

Original Gravity: 1.050
Terminal Gravity: 1.012
Color: 9.45 °SRM
Bitterness: 31.7 IBU
Alcohol (%volume): 5.1%

Instructions:

Make a 2 liter yeast starter a few days before you brew. Mash all the grains at 150° F for 60 minutes. Collect enough wort for a seven gallon volume. Boil for 60 minutes and add the hops at the times specified. With the late Cascade additions, you can double the amounts if you want more hop flavor. I will be using homegrown hops so the alpha acid percentages noted are standard. I will not know what the percentages will be on mine but I like living on the edge.

Ferment at 68° F for 2 weeks and bottle or keg as usual. There is no need for a secondary phase. This beer should be good to go once it is fully carbonated. I am going to target 2.5 volumes of CO2 for mine.

Page 157 of 322

Powered by WordPress & Theme by Anders Norén