Brew Dudes

Homebrewing Blog and Resource

The hobby of homebrewing beer

PicoBrew First Brew Session – Countertop Brewing

This week, Mike and I kick off the first brew session of our PicoBrew Pro. Since it was generously sent to us for review purposes, we were very excited to give it a try. After unboxing it, reading the instructions as best we could, and taking the machine through its first rinse. Here’s the video detailing the first brew:

Brewing Simplicity

I know that the biggest benefit of these countertop brewing machine is how simple the process is, but it’s really difficult to express how easy it is to brew with this thing. With two gallons of distilled water, you will be able to fill up the keg and the water reservoir at the top of the machine (that’s all the water you need – yes, it’s a small volume, and we’ll talk about that). After the water is added to the proper places, you drop the Pico Pak into the drawer or Step Filter as they call it. After the Pak is secure, you slide the Step Filter into the machine. Then, with a press of one button a few times, you are brewing. Well, the machine is brewing for you but you’re still its master.

For now…until Skynet takes over.

The machine makes some humming noises, not unlike a dishwasher. After about 10 minutes, your brewing space starts to smell wonderful. Like any homebrewer will tell you, there is something special about the scent of malted barley soup in the air.

Once the brewing process begins, you can walk away. This brew session had a duration that was close to two and a half hours. Imagine having 2.5 hours to do other stuff while the machine brews!

Brewing Data

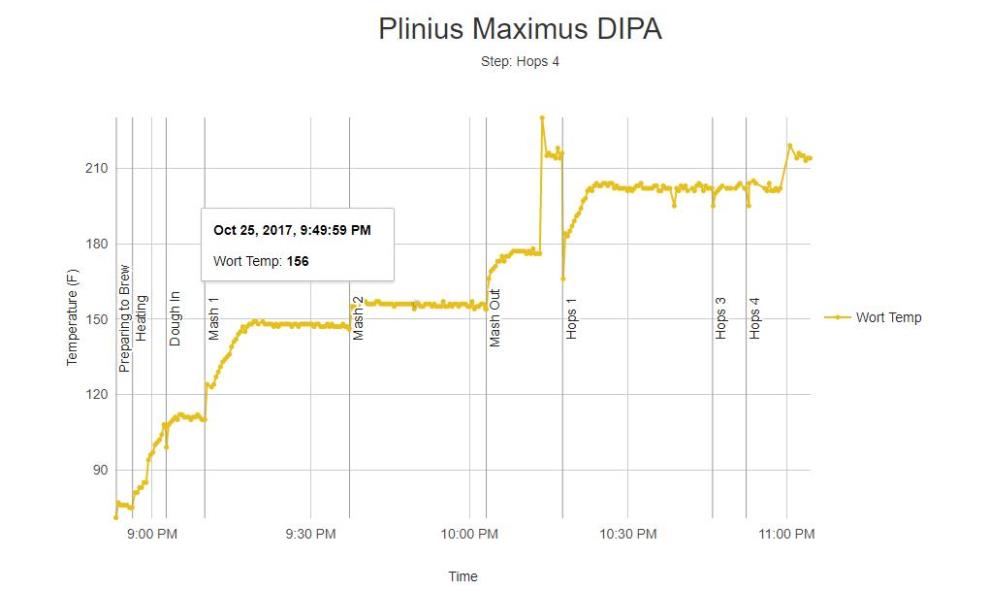
Since the PicoBrew is WiFi enabled, data could be streamed to my account though my home wireless connection. Here’s a chart of the brew session detailing the temp of the wort and the different mash steps and hop “additions”.

Plinius Maximus Brew Session Data

Overall, I am pretty impressed. It was really cool to try it out. The session was effortless and I am amazed at the tech. After this PicoBrew First Brew Session, I am looking forward to the results.

Brew On!

Check out our other PicoBrew posts: Pico Pro unboxing and tasting the first Pico Pro brew.

PicoBrew Unboxing and Equipment Review

The PicoBrew company sent these Brew Dudes a Pico Pro brewing machine to evaluate so we took some time to unbox the equipment and review all the different pieces in this video.

This post will be one of three since there is a lot to absorb here. We thought it would be good to start off with all the equipment that goes along with the Pico Pro system since it is quite a difference from what we are used to with our “system” that we built ourselves over time.

Of course, brewing with the machine and tasting the final product will be important to cover, don’t you think?

We will definitely cover both of those items. Your patience will be rewarded.

Pico Pro Equipment

The first piece that is worth commenting about it the main unit itself. It’s squared shaped and cleanly designed. The top opens up so you can pour water into it like a coffee pot. The front slides out so that you can place the PicoPak into it. Then, you slide the whole thing back into the unit to start the brewing process.

We’ll see how easy the brewing process is. I think once the pak is in the unit, the brew process is one push of a button – more on that later.

The other cool pieces are the kegs that came with the Pro system. There are two; one for fermentation and one for serving. The fermentation keg comes with a top that allows for an airlock to be inserted into it. The other one has a typical corny keg seal and a picnic tap, which will be cool to see in action.

There is also smaller pieces that allow you to cook meat via a sous vide technique in the main unit. I’m not sure if we will get to that in this initial review, but it worth mentioning.

We appreciate you taking the time to follow us on this PicoBrew review. We are curious how it will work and what the outcomes will be. With all things homebrewing, it always ends up with beer so it will be good no matter what.

Brew on!

Read our other PicoBrew posts: The first brew session and the first beer tasting.

Gueuze Tasting and Review

When you start a project and you know it will take at least 3 years to complete, you don’t really have a strong idea of when that day will come when you can finally taste the end result of all your efforts. I took it one day at a time. Well, more like put the beer out of my sight so I could ignore it until I needed to do something with it. We blended the three different sour beers of three different ages and combined it to make this beer. This video shows off these Brew Dudes first Gueuze tasting:

Gueuze Style and Notes

I think the biggest things we kept in mind as we blended this beer together was that we wanted to make sure that the best flavors were going to be in the final beer. Even though the process we took to get the blend right had structure, we still needed to bring some art to the project. The final blend was a little less science and more of a feel as I did not want to bring in too much of the two year sour beer into the gueuze.

From what I read, the style should be balanced, pleasantly sour, and refreshing. With the new wave of American wild ales, I think there is a level of sour that we are looking for in these types of beers. I was looking to bring some sour, some barnyard, maybe some fruit, and a whole lot of carbonation. I got the right bottles and the corks to handle it!

Overall, I am happy of this beer and proud of the patience that I practiced throughout. Sometimes I thought I wouldn’t see the end of the line, not for any specific reason, just three years is a long time and stuff could go wrong. Ok, maybe that’s just me being morbid.

For you, the reader, I say take your homebrewing practice and instill a long game to it. You should have something sitting around waiting to be excellent at some point in the near future.

Brew ON!

Juicy American Pale Ale

Now that we have a Juicy AF NEIPA, what about making a really fruity pale ale? It’s all the intense juicy hop flavors of a New England style IPA with lower alcohol. He accomplished this with less malt in this grain bill and with a hop burst process during his brew session. Watch this video to learn more about the Mike’s little Juicy American Pale Ale.

Juicy American Pale Ale Recipe

Batch Size: 5 gallons

Grains:
8 pounds of Golden Promise Malt (84% of the grist)
1 Pound of Torrified Wheat (10% of the grist)
10 ounces of 40°L Caramel Malt (6% of the grist)

Hops:

1 ounce of Galaxy hops with 10 minutes to go in the boil
1 ounce of Motueka hops with 10 minutes to go in the boil

1 ounce of Galaxy hops with 5 minutes to go in the boil
1 ounce of Motueka hops with 5 minutes to go in the boil

1 ounce of Galaxy hops at flameout
1 ounce of Motueka hops at flameout
1 ounce of Cascade hops at flameout

At the end of fermentation:

1 ounce of Amarillo hops, dry hopped and left in keg
1 ounce of Mosaic hops, dry hopped and left in keg

Starting gravity: 1.045
Final gravity: 1.010
IBUs: 47
Estimated ABV: 4.5%

Water Chemistry:
Distilled water

Calcium: 128 PPM
Sulfate: 220 PPM
Chloride: 64 PPM

3:1 Sulfate to Chloride ratio

Yeast: Danstar Nottingham Dry Ale yeast

Tasting Notes

Mike packed this beer with a lot of hops, even dry hopped it in the keg. The varieties he used were all “New World” hops, which all have big pungent aromas and flavors unlike the refined one of noble hops.

Because of his water chemistry, specifically his sulfate to chloride ratio, the beer tasted more like a west coast pale ale than the newfangled New England style counterparts. Based on this outcome, it clears the path for some modifications for future brews.

Using this grain bill, Mike or you could brew a sessionable, hop forward APA with:

  • Classic American hops (Cascade, Centennial, CTZ)
  • Water Chemistry that features a 3:1 chloride to sulfate ratio
  • An American yeast strain

Any combination of these variables would make for a great beer that you could enjoy all day long.

Take a shot and brew on!

Homebrewing a New England IPA – Recipe and Instructions

The New England style IPA is a style that is gaining popularity across the globe. These Brew Dudes conducted research, mostly one can at a time, to discover the aspects of what makes this type of beer great and how we could brew one at home. See the results of homebrewing a New England IPA – NEIPA – in this video:

If you’re tired of waiting in line at your favorite brewery, try this recipe to brew a NEIPA at home.

NEIPA Recipe

Beer Name: Juicy AF

5 gallon batch
7 gallon boil size

Water:
6 gallons filtered tap
(Since we live in New England, our water is high in chloride and is appropriate for the style)
3 gallons distilled
(Our water is also high in sodium, which is just bad for beer so we added some distilled water to dilute our tap water)

Grains:
13 pounds Thomas Fawcett Pearl Malt
0.5 pounds Weyermann Munich Type 1 Malt
1 pound Briess Flaked Barley
1 pound Briess Flaked White Wheat
1 pound table sugar (added with 15 minutes to go in the boil)

Mashed with 4 gallons of water (3 gallons tap – 1 gallon distilled) at 155° F. Batch sparged with the rest of the water at 170° F

Boiled for 60 minutes

Hops:
Simcoe – 1 ounce -30 minutes to go in the boil
Simcoe – 1 ounce – Flameout
Amarillo – 1 ounce – Flameout
Galaxy – 1 ounce – Flameout
Simcoe – 1 ounce – Whirlpool
Amarillo – 1 ounce – Whirlpool
Galaxy – 1 ounce – Whirlpool
Mosaic – 1 ounce – Day 3 of primary fermentation
Amarillo – 1 ounce – Day 3 of primary fermentation
Galaxy – 1 ounce – Day 3 of primary fermentation
Mosaic 2 ounces – Day 7 of primary fermentation
Galaxy – 1 ounce – Day 7 of primary fermentation

Yeast:
Giga Yeast VT IPA – 1 pouch in a 3 Liter starter

Total fermentation time was 10 days at 66°F. Kegged right from primary fermentation vessel.

OG: 1.065
FG: 1.012
ABV: 6.96%

Thoughts on Improvements and Changes for Next Time

At posting, the BJCP does not have style guidelines for the NEIPA. From our research, these beers are cloudy in appearance and aggressively hopped but not bitter. The hop flavors express themselves as fruit forward with many notes of tropical, stone fruit, and citrus flavors.

Some people say it looks like gravy and tastes like juice. I think they’re right and I was able to hit those notes with this beer.

The amount and varieties of hops brought about the flavors I wanted. I would use this combination of hops again. I feel like Galaxy should be your lead hop for flavor with all the pineapple goodness it brings with Simcoe as your light bittering charge because of the dankiness it imparts.

The yeast starter was key. I had a quick fermentation and the yeast really made the hop flavors shine. The temperature was a little lower than I normally use but the pitch rate made sure everything finished completely.

I think the grain bill needs a little tweaking. I don’t think this beer needs any malts to enhance the color or the maltiness. If I brew this one again, I would remove the Munich. This beer is so out of balance towards the hops, I don’t think there is any way you can make a malt flavor pop in the finished beer. The flaked wheat and barley do a good job to keep the mouthfeel slick and the proceedings cloudy.

The pound of sugar is important as it does dry out the finish, leaving you with the need to take more sips of this excellent beer.

BREW ON!

Page 89 of 317