
Brew Dudes

Homebrewing Blog and Resource

The hobby of homebrewing beer

Double Brew, One Mash

My Kolsch and IPA brew session went of without a hitch last Friday night.  Today, almost a week later both beers are almost quiet with their fermentation activity, but I’ll continue to let them set for another week before I rack them into kegs.   I may dry hop the IPA with 2oz of Cascade plugs I have.  And I need to get that Kolsch chilled down for some cold conditioning.

During this session I brewed the two beers from the same mash.  Doing this saves some time and allows me to get two full beers out of one mash session.  I have two burners to use so I can split the total wort and then boil the two worts at the same time.  I have done this double sized mash a couple times and I find it works really well for me.

In my Kolsch recipe it called for base malt (Pils), some Munich and some CaraPils.  That is a pretty simple grain base that I felt would work also as a base for a clean American style pale ale like IPA.  My IPA recipe reflects that base and also has the addition of some crystal 120L in it to get more of that crystal malt flavor that I like in a pale ale.  My approach with the double sized mash then is to mash with enough grain to generate enough wort to cover both batches.  In this case I needed about 13 gallons of wort.  I calculate the amount of grain needed to be sure to hit the gravity of the highest of the two OGs (in this case the IPA at 1.060).  Then I can dilute down some of the resultant wort with water to get to the appropriate pre-boil gravity of the lower gravity beer ( in this case the Kolsch at 1.040).

Once I had collected all the wort I needed, I diluted the wort for the Kolsch and started the boil.  For the IPA wort, I placed the 0.5lb of Crystal 120L in a grain bag and steeped in in the wort for 30-40 minutes. At the same time, I started the boil in the Kolsch.  A second advantage to this steeping phase is that it helps set up my chiller process.  If you start both beers at the same time, then one beer will have to sit hot while you chill the first one down.  In this session, I steeped for about 40 minutes in the IPA.  This builds in a 40 minutes buffer for me to get the Kolsch chilled and transferred at the end of its boil before I need to start chilling the IPA.

Essentially this double mash session is like using a big batch of extract wort that you would then use with specialty grains to get the beer you want.  The greatest difference here is that I am using an all-grain process to control the mash profile of the wort I am making (which you can’t get with extracts) and I am controling the freshness of that wort (which you are always unsure of with extracts).  I have used this techinque to mash in a large batch of English Pale malt to make a porter and an English Pale.  The variations are endless.  It’s just like doing extract with grains.  I think that this technique is a great way to get double the production with just a little more work (essentially just the staggered start times difference for chilling).  Try it out for yourself and let us know how it works out for you.  Just be prepared to now have twice the beer on hand after each brew session.
American IPA Recipe

Here is my most recent attempt at an IPA.  I got a hold of some Centennial and some Columbus hops, which I had never tried.  I couldn’t get enough to base my IPA entirely on those hops. So you’ll see in the recipe that I use a little high alpha Nugget to get my base bittering, and I introduce a little Cascade hops in the hop schedule as well.  I used some cascade to help reinforce that traditional citrus-driven American hop profile in the brew.

You may think it strange as well that my malt base is dominated by German Pils.  The reason for that is because I was making a Kolsch at the same time and wanted to make one big mash for the two beers.  More on that in a seperate post!

Here’s the recipe:

American IPA
14-B American IPA

Size: 5.5 gal
Efficiency: 70%
Attenuation: 75.0%
Original Gravity: 1.061 (1.056 – 1.075)
Terminal Gravity: 1.015 (1.010 – 1.018)
Color: 13.3 (6.0 – 15.0)
Bitterness: 54.75 (40.0 – 60.0)

Ingredients:
11 lbs German 2-row Pils
1.0 lbs German Light Munich
1.0 lbs 2-Row Carapils® Malt
0.5 lbs Crystal Malt 120°L
0.33 oz Nugget (12.7%) – added during boil, boiled 60 min
0.66 oz Cascade (5.5%) – added during boil, boiled 60 min
0.5 oz Columbus (13%) – added during boil, boiled 20 min
0.5 oz Centennial (9%) – added during boil, boiled 20 min
0.5 oz Columbus (13%) – added during boil, boiled 2 min
0.5 oz Centennial (9%) – added during boil, boiled 2 min
0.5 oz Cascade (5.5%) – added during boil, boiled 2 min
1 ea White Labs WLP001 California Ale
1 tsp Irish Moss – added during boil, boiled 0.0 min

Mash at 152F 90minutes
 

Heating Pad For Fermentation

So I was forced to move my fermentation bucket from my second bathroom to my basement because we had “people coming over”. No need freaking them out too with my constant airlock sniffing. Moving my fermenter to my basement did pose a problem though. My basement’s ambient temperature has been hanging around 50F due to the return of a classic New England winter.

I knew the basement temps were not going to fit into my yeast’s optimal fermentation temps (65F to 70F)…so after 7 days of rocking a constant 68F…I had to figure out a way to keep the bucket in the right temperature range in the cold basement.

First, I wrapped my fermentation bucket with a thick towel to keep in the heat the yeast was producing on its own. Then, I got an old heating pad, placed it on a chair, turned it on to the “Low” setting, and set the fermenter on top of it.

After 3 full days of using this set-up, I was able to keep the temperature of the bucket in the 67F-68F range. Nice.

Some my thoughts:

  • I set the whole thing on a chair so I get away from the cold concrete of the basement floor.
  • The towel also kept the heat generated from the heating pad from escaping
  • The towel also kept light out…no direct sunlight in the basement but we have fluorescent bulbs that probably aren’t good for a young beer.

The more I brew and the more I strive for making beer, I feel the next step in improving my technique comes from nailing down good fermentation procedures. Not sure if my makeshift heating rig really worked, but the thermometer is giving me good signals.

Hit My Specific Gravity

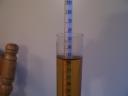
I bought a replacement hydrometer on Friday and I hit my targeted SG on the American Pale Ale.  Here is a photo of the reading.


Hitting My Original Gravity


Sweet!

My targeted specific gravity was 1.050 and I hit it on the dot.
To see my brew day notes on the American Pale Ale, follow this link:

American Pale Ale

Double Brew Session TONIGHT!

Well I am finally getting around to brew.  Its been a while and I can’t wait to get those propane burners fired up.  Last night I did most of my preparation to trim a little time off of what will surely be a late brew session.  I weighed and crushed my grains, set out my mash tun and set out my two burners and hooked up the propane tanks.  I also filled one pot with 8 gallons of water for my mash.  So all I have to do when I get home after work will be to light the burner and wait for things to come to temp.

Tonight I am going to be doing two beers a Kolsch and an American IPA.  As a Brew Dudes first, I am going to be using a technique that I have been experimenting with but I haven’t talked about much here yet.  I am going to be only doing one very large mash, then pulling enough wort for both beers with the same grain base (also called the grist). I don’t have a catchy name for the technique yet, but I a sort of like Doubling Down Mashing.  More on the specifics later, but for now if you follow this brew-log you get a glimpse of how its done.

I already posted my Kolsch recipe, I’ll be sure to get the IPA written up before my next update to this brew-log.

I’ll try and get some results up to the site tomorrow with some pictures of the session.
Happy Brewing!

Page 299 of 322

Powered by WordPress & Theme by Anders Norén