Brew Dudes

Homebrewing Blog and Resource

The hobby of homebrewing beer

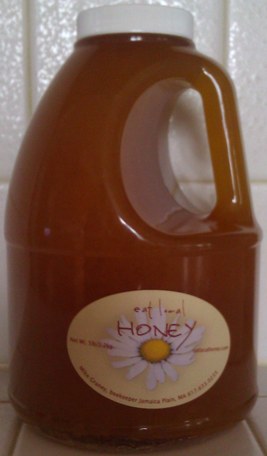
Brewing Beer with Honey

Honey is a delicious, sweet food that many homebrewers come around to dream about using in their beer recipes. Brewing a honey beer at home is tasty and fun.  This post has information about brewing beer with honey and how to best incorporate it into your homebrew recipe.

Since honey is almost totally fermentable, all the sweetness that you perceive in honey in its natural form will be converted by the yeast after fermentation.

Adding honey later in the brewing process will help you to retain more flavor in the finished beer.

Another good reason to add honey or any large amount of simple sugars later in the brewing process is to drive your beer’s final gravity closer to where you want it.  A large amount (defined as 2 pounds or higher) of honey added during the boil may cause your beer’s final gravity to be higher than expected.  Your yeast will feed on the simple sugars of the honey first, then turn to the maltose provided by the grains.  If there are too many simple sugars, the yeast may get tired out and may not be able to ferment as much of the complex sugars as expected.

A successful way to add a large amount of honey to your beer large is to add them after about 4 days of fermentation.

Let the yeast work away at the maltose first, and then give them simple sugars for dessert.  This way you’ll still make your target final gravity.

Honey is fairly voluminous so it may be difficult to transfer into your primary fermentation vessel.  Try warming it while it is still in its container in a water bath with a temperature of 100° F or 38° C for around 30 to 45 minutes.  It should get into a less viscous state and should pour easily into your fermentor.

Beers brewed with honey can have a thin body if the yeast is successful in fermenting it completely.  You can combat this issue. If you are an all grain brewer, mash your grains at a higher temperature around 155° F or 68° C.  Extract brewers can use some maltodextrin (half pound) to increase the body of their beer.

Learn about my plans to add honey to the secondary.

Honey for beer brewing

Rice Hulls

The great thing about summer is the fact that friends will come and see you at a moment’s notice.  In the winter time, they are slow moving.  Visits take planning.  In the summer, they are at your doorstep as soon as you hang up the phone.

If they visit, they will drink beer.  If they drink beer, you will need to brew again…soon!

I am getting my thoughts together for the next brew.  Since I am brewing a wheat beer and the first all grain brew had a stuck sparge, I was thinking I should buy some rice hulls.

Rice hulls are the coverings of rice that protect the grain during its grow.  When it’s harvested, it is removed.  I don’t think we can digest them.  Although we can’t (shouldn’t) eat them, the hulls can be put to good use.

We can put them into our mash so it does not get stuck.  They will act as a sort of internal strainer/separator to keep glue-y grains like oats and wheat from becoming an impenetrable clump.

Rice hulls can be added right to the mash.  They add no color, flavor, or fermentables.  They are just your “inside the tun” helpers.

Just be sure to rinse them thoroughly before use.

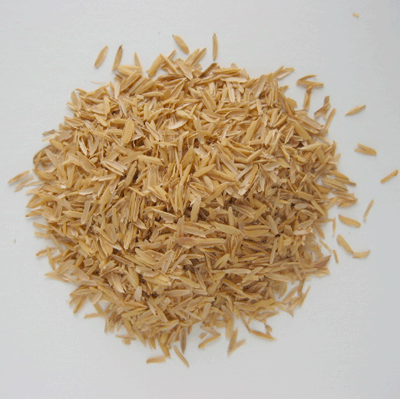
Here’s a photo of our rice hull pals:

Rice Hulls

For the record, I don’t think I absolutely need rice hulls for my wheat beer recipe since I think I have enough barley malt to keep things a-moving. I just want to try them out.

Home Brewing In The Summer

Welcome to Fermentation Friday for June 2009!  The theme for this month was “beating the summer heat” when homebrewing.  Here are posts from other homebrewing bloggers:

Andy posted a comment:

I’ve only just started and my batches are small (1-3 gallons) so I can get away with cranking up the AC in my minuscule apartment. I guess that’s ‘cheating’ though huh?

Bryon states brewing outdoors is aces in his book.

B James writes about how summer brewing is a  face-smashing, tasing good time!

Dan left a comment:

I bought a garden hose splitter/adapter so I can run both an immersion chiller and CFC concurrently. This allows for a much faster chilling of the wort even with the almost 60 degree water coming out of the tap. I actually brewed a Maerzen on Monday in about 95 very humid degrees and was able to get the wort down to 58 degrees in under 15 minutes.  Either one by itself would have taken quite a bit longer.

Adam adds his contribution to beating the summer heat.

Steph describes her and her husband’s summer brewing solutions.

Chris gives us the cure for the Summertime Brewing Blues.

Jake writes:

I now have a few approaches, I do have a freezer for lagering so I am safe that way, I try to brew belgians during the hottest summer months, and I always ferment my ales in a cold water bath, it helps regulate the temperature.

Until I can dig a root cellar, those are my strategies!

Richard added:

The summertime is the perfect time for a nice cold golden brew. I mean I love a nice hoppy, rich, home brew, but after mowing the lawn in the hot summer sun, nothing goes down better than a nice cold Highlife(insert light beer of your choice). This year B James, McPaddy and I got a jump on summer and began brewing what we hoped was a Highlife clone. We started a little early, so that we could stil enjoy it during the hotter summer months.

Brewing lighter beer isn’t an easy task. You don’t have all the hops and malts that typically mask your mistakes. We ended up substituting rice sugar for our grains. It’s ready to open now, and I am anxious to see how it turned out. 

Rob asks, why beat the heat when you can join it?

Peter tends to brew seasonally.

Keith rocks the fridge with a temperature controller.

Matt C. AKA The GISBREWMASTER writes about long wort chill times.


Mike wrote the Brew Dudes response:The summer is a great time for beer.  Cook-outs, family gatherings, water sports and the beach are all perfectly paired with your favorite brews: Wheat Ale, Pilsners, Lawnmower Beer and the quintessential fruit beers.  The opportunities to brew up something out of the ordinary are just part of the excitement of summer.  The only problem is the damn HEAT!  Man!  The heat of the summer can really be a factor when brewing; from in the brew-house on brew day to fermentation temperatures during the week that follows here are some simple way I like to beat the heat.

Brew Day:  I am one of those odd ball people that lives by the “early to rise” mantra.  When most guys are just firing up the brew kettles, I am rinsing mine out and putting them away.  Standing over a boiling 6 gallon pot of wort is not the way I want to spend a 90+ degree day with 90% humidity.  It makes brewing a real chore.  For me I like to get up early before the sun rises and after the world has had a chance to cool off to get started.  A summer time 4AM start is not uncommon for me.  The flip side is possible if you are a night owl.  Cool summer nights are often quite a pleasant time. After the sun sets and people are stowed away in the climate controlled sanctuaries of their living rooms, the world becomes a nice quite place to enjoy all alone (minus the low hum of you neighbors AC unit).

Fermentation:  Even if you are tough enough to brew 12 gallons of Russian Imperial Stout at high noon in August…I can guarantee you your yeast isn’t.  If you routinely only cool your wort down to 75 and pitch, then in most climes of the US, expect fermentation to take your hard fought wort straight to temperatures that scream out head splitting hangover higher-order alcohols.  Not to mention out of control esters and lifelessly thin beers.  For those of us without a fermentation fridge there are a couple alternatives.  A cheap option is the swamp cooler.  A swamp cooler is simply a tub or container large enough for your fermentor to sit in with a good couple of inches of water around it, and coming about half way up the sides.  This increases the thermal mass of the whole fermentation vessel and helps to slow down heat gains and losses.  If you rotate in and out frozen water bottles or ice packs, then you create a really nice heat “sink” to help suck heat right out of the fermentor.  IF that isn’t enough cooling power you can even drape a cotton T-shirt over your fermentor and put a fan blowing across it.  This acts to help wick water up and over the fermentor and promotes evaporation.  Very similar to out own bodies sweating mechanism.  I have brewed many successful ales in a hot garage this way and was able to maintain 68F fermentation temps even when external temp was above 90F. An even cheaper way around this is to get on the Saison bandwagon.  Saison yeasts typically are started out cool for the first day or so, then allowed to just rise up into the low 80s!  So a simple swamp cooler to start, then just let the thing go.  Not much easier than that.

Post Brew Day: Well I don’t know how you beat the heat, but after a 4AM brew session there is nothing better than a nice ice cold citrusy Belgian Wit with pancakes, followed by a nice nap before the sun reaches its peak!

BREW ON!

I will be adding more submissions as the day progresses.  If you haven’t sent yours in yet, it’s not too late to do so.

Weizenbock Recipe

I am picking up some wheat malt in the near future for the Honey Wheat.  I was thinking I could brew another wheat beer for the Fall…which led me to thinking about Weizenbocks. I think a nice mahogany colored, spicy, malty, dark fruity, beer would be good right around September. I know – don’t rush it – but you have to plan ahead. Here’s my all grain weizenbock recipe:

Ingredients:

7.25 lbs. German Wheat Malt
4.50 lbs. German 2-row Pilsner Malt
1 lbs. Munich Malt
1 lbs. Honey Malt
.75 lbs. Belgian Special B Malt
1.5 oz. Hallertau Mittelfruh (Pellets, 4.50 %AA) boiled 60 min.
Yeast: White Labs WLP380 Hefeweizen IV Ale

Predictions:

Original Gravity: 1.073
Terminal Gravity: 1.018
Color: 17.45 °SRM
Bitterness: 22.5 IBU
Alcohol (%volume): 7.3%

Notes:

Make a yeast starter. Mash at 154° F for 60 minutes. Ferment at 68° F for 2 weeks.

Mash Tun Design

I recently told you about my desire to rebuild my brewery and my need to retool a couple pieces of equipment.

This post will address some thoughts on my mash tun.  I currently use a 50qt “ice-cube” cooler.  I like coolers because they are already insulated and come in a variety of shapes.  They are relatively cheap and easy to drill hole or what have you.  The biggest draw back is the flat bottoms.

I think the ultimate mashing device would truly drain from the bottom, beneath the grain bed.  Furthermore, there would be no pick up tube pulling wort off the bottom UP and OUT the side of the tun.  In my mind I have been pondering using a 15.5 gallon keg upside down.  My thought was to remove the sanke keg spear and valve assembly just leave the inch and a half throat open.  Then turn the keg upside down and cut out the bottom of the keg.  Using a false bottom and a couple tri-clover type fitting I could get a keg mash-tun that truly drained from the bottom without the need of a pick up tube.

I think its an interesting idea.  And I like the idea of building something sort of unique (although, I have heard of people doing this, I haven’t seen to many of them in pictures on posts).  The only draw back I have to the idea is that it would certain ruin the keg of any other application should I decide I want to build a direct fired tun or use it as a HLT or kettle in the future.  Kegs are expensive and sort of hard to get these days.

So I worry about not being happy with that type of design, or it not working out right.  If I build a normal keg mash tun with a false bottom and pick up tube assembly (which works for plenty of people), then I could heat mash water in the mash tun directly and not have to transfer water from a heated source into an upside down non-fired mash vessel….
Decisions decisions…
What are your thoughts?  Maybe you just want to see me ruin a keg for giggles????

BREW ON!

Page 260 of 322

Powered by WordPress & Theme by Anders Norén