Brew Dudes

Homebrewing Blog and Resource

The hobby of homebrewing beer

Maibock Gravity Reading

I took a gravity reading yesterday following my own advice about how to do it. My hydrometer read 1.015 which is a little lower than my target, but in the ballpark.

I tasted the sample to see if I had a diacetyl problem. I didn’t get any overwhelming buttered popcorn or butterscotch taste. The sample did leave a bit of a coating on the roof of my mouth that was kinda slick.

Mike came over the house because we were going to a scotch tasting in the afternoon. (I betcha didn’t know we were Scotch dudes too!) He tasted it and came to the same conclusion.

Anyway, I brought my fermentating bucket up to the ground floor of my house and I put it in the front hall closet. It is sitting pretty at 62° F and I will probably leave it there for a good 36 hours. I hope the yeast still has some oomph to clean up the diacetyl.

Tomorrow night I will rack the beer to a glass carboy and let it sit in my beer fridge for a month or so.

More on the fridge later.
Gravity Readings During Fermentation

The only way to know that fermentation is complete is to take a gravity reading from your fermentor.

Here are points to keep in mind about gravity readings during fermentation from my perspective:

  1. You want to get a long, thin cylinder/tube of some sort that is easy to clean and sanitize.  I have seen homebrewers use (new) turkey basters.  I have seen homebrewers use glass wine thieves.  I have a nice plastic one that can be broken apart into 3 pieces for easy cleaning.  Whatever you use, you want to make sure it fits the opening of your fermentor and it has openings on both ends.
  2. Like I alluded to earlier, clean your tube well and sanitize it before you use it to take your gravity reading.  It is extremely important that you are confident that your tube is cleaned and sanitized (TWSS).
  3. Open your fermentor in a non-drafty place. You want to minimize the chance that wild yeast get into your fermentor.
  4. Put the tube into your fermentor to a level that fills the tube with a good sized sample.
  5. Put your thumb on the end of the tube that is in your hand and slowly pull the tube out of your fermentor.
  6. Use the sample for whatever tool you use to get gravity reading like a hydrometer or a refractometer. If you are using a hydrometer, you may need to repeat the process to get a sample big enough for a reading.
  7. Some brewers return the unused part of the sample back to the fermentor.  If you think it is clean, then go ahead.  If you feel like you have compromised it in a way that may bring infection or other bad things to your beer, just chuck it or drink it. For instance, if you didn’t clean your hydrometer cylinder, don’t put sample back in the fermentor.

If you have hit your target final gravity, then go to your next stage of the beer’s life.  I use samples from the primary fermentor for a few purposes.  One is to check the gravity.  The other, if I am brewing a lager, is to taste it for diacetyl and see if I need a diacetyl rest to have the yeast clean it up.

Hey, while you’re here… read some other blog posts that are related and you might find helpful:

Kegging Your Homebrew

Cask Conditioned Homebrew

Switching Local Home Brew Shops

…or what happens when you are outgrowing your LHBS.

I was going to write this post as an open letter to Beer & Wine Hobby….but it’s not their fault.

Like a common theme in some break ups: It’s not you, it’s me.

You see, I’ve grown as a homebrewer.  I am brewing beyond kits.  I am brewing beyond the top 20% most popular ingredients.  I want to make great beer…not just good beer, but great beer.

I don’t think I can get to where I want to be with my current home brew shop.  I think they have a successful business.  I think they really help people who want to get into brewing beer get over the initial obstacles that stand in their way.  I just don’t see them as a good resource for homebrewers who are more advanced or more experienced.

What doesn’t suit me is having to seek out alternatives for ingredients that should be on hand.  I am not talking about “out of stock” stuff.  I am talking about ingredients that they just don’t carry.

I am sure there are business reasons for why they carry what they carry.  I am sure their customer base gets what they need.  I guess I am saying that I am not getting what I need.

So now what?   Do I need to get back out there immediately and try to find a new one?

Has this situation happened to you?  What did you do?

I really don’t want to go the whole online catalog route, but that may be the best solution.

Fermenting in Corny Kegs

I had been thinking about using a couple corny kegs as fermentors.  Maybe even trimming up some dip tubes to be able to CO2 push finished beer out of the kegs to clean serving kegs.
Here are some of the things I am concerned about.

1. Using the standard gas out port for my airlock set up (tubing and a water jug), may have more restriction than I am used to.  A source of regular clogging perhaps?

2. The corny keg only holds about 5.25 gallons.  This almost ensures the need to blow off every time, and as stated in part 1 cleaning that narrow a diameter tubing would be a pain each time.  The fix would be 4 gallon batches.  I nice idea for experimenting with recipes, but my mash tun and boil kettle are all somewhat optimized for 10 gallon brew sessions.  Do I really want to ferment in two kegs for each batch?

3. The stainless keg is a superior container for sure.  Light, easy to move, relatively indestructible.  But I’d be competing for keg fermentor space all the time vs. keg serving space.

Fermenting in Corny kegs just doesn’t seem to have a enough plus sides.  Am I missing any?

See these other posts about fermentor choices also:

Fermentor Vessels

Glass or Plastic

Lager Fermentation Temperature

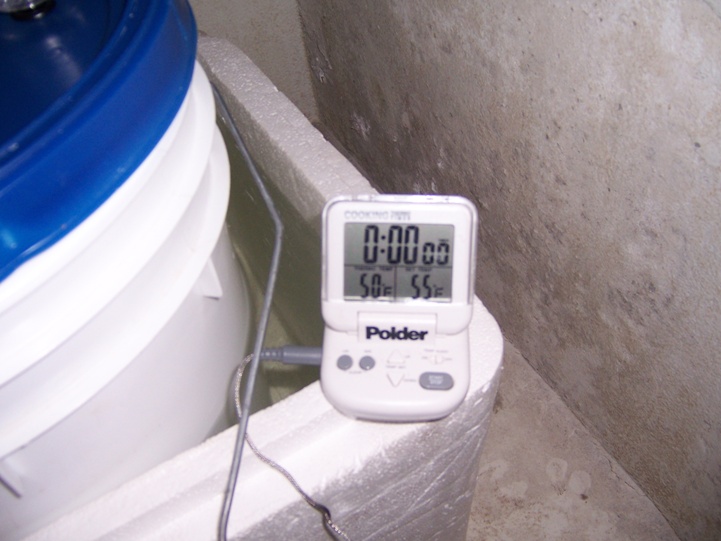
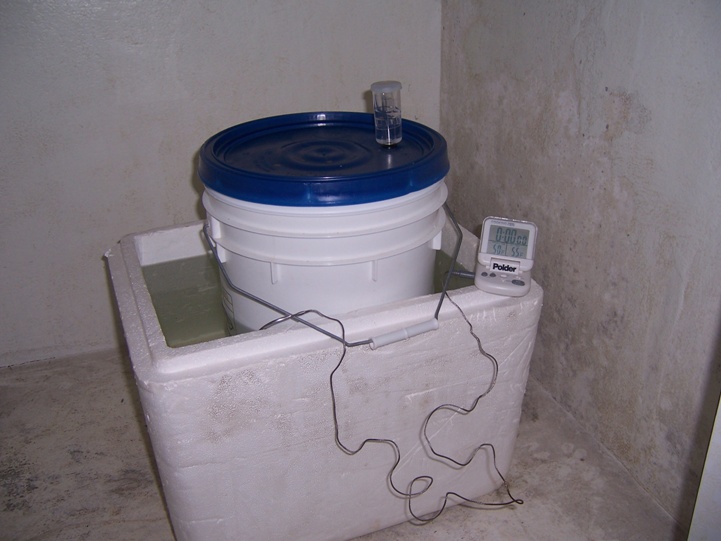
Just as an update, I took a couple of photos of my lager fermentation set up:

Lager Primary Fermentation     Maibock Fermentation Temperature

 This is a photo from my basement.  For the most part, the air temperature in my basement is around 53°F.  To keep the fermenter at 50°F, I put it in this styrofoam box and filled it with water.  If the temp goes up, I can put some snow in the water to cool down the fermenter.  We got 6 more inches on Sunday night and I might as well use it for something.

The lock is clacking away.  I wouldn’t say it is as vigorous as an ale fermentation, but it is steady.

We’ll keep an eye on this one.   Brew On.

Page 243 of 322

Powered by WordPress & Theme by Anders Norén